Apaleo
How to set-up OAuth app
Go to Apps Section section within your Apaleo Developer account as shown below. Click on
+ Add a new store appas shown below.
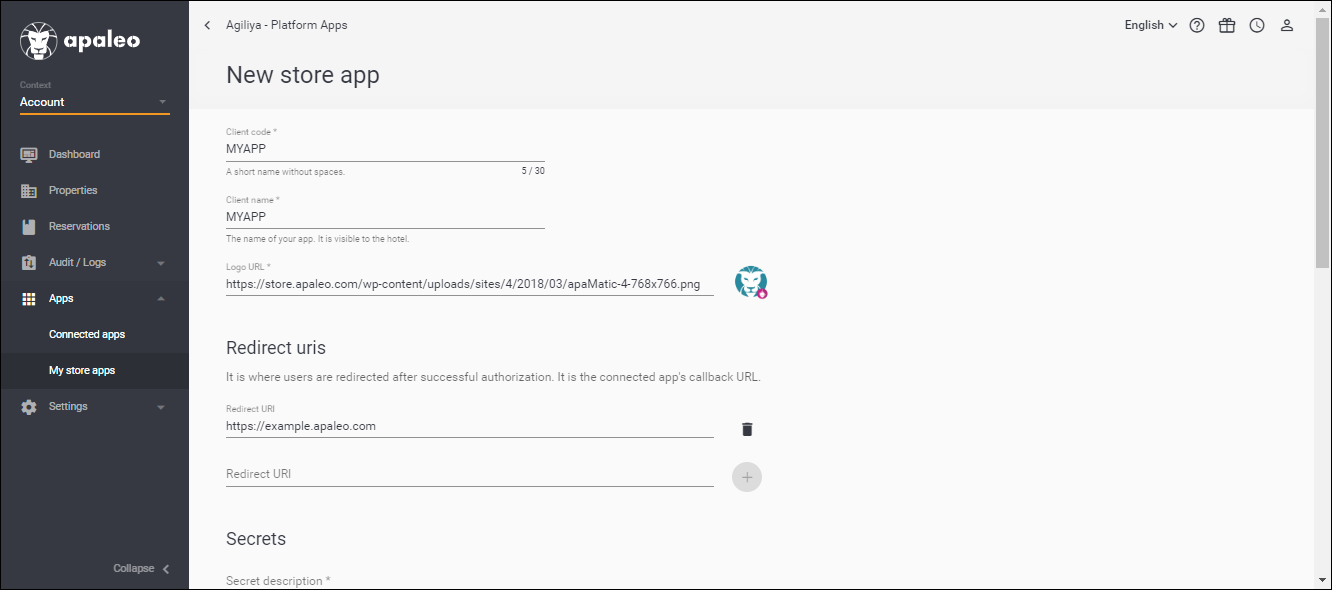
On the New Store App page, enter the following details:
- Client Code: Enter a unique key for your application. You can use a short form of your company name for the same. For ex: If the name is Calry, you can use CLRY.
- Client Name: Enter the name of your application. This is seen by the end-user in the consent screen during OAuth process.
- Personally identifiable information: Select
Retrieveto recive all the personal information such as guest name, address, country etc. - Logo URL: URL string that references to your application logo. This will also be seen by the end-user during the OAuth process.
- Redirect URLs:
- If you're using Calry's sandbox environment, use
https://dev.calry.app/api/v1/oauth/callback - If you're using Calry's production environment, use
https://prod.calry.app/api/v1/oauth/callback
- If you're using Calry's sandbox environment, use
- Secrets: Description of your secret. You can add a new secret in case you existing client secret has been compromised.
- Scopes: Only select
Core API.
Once these steps are completed, click on 'Save'.
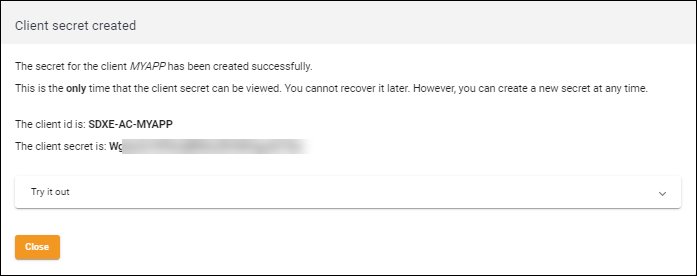
Review your app details and Click on 'Close'. Copy the Client ID and Client secret to your clipboard as they will be useful in the subsequent steps.
Now, go to Calry webapp > OAuth > '+ New OAuth app'. Select Apaleo from the drop down in Integration type. Paste the
client_idandclient_secretfrom step 3.Provide a name for the Integration Auth.
Paste this in the scope input box:
offline_access account.manage account.suspend accounting.read authorizations.manage authorizations.read availability.manage availability.read captcha-protection charges.delete companies.manage companies.read depositItems.manage deposits.manage deposits.read folios.manage folios.payment-with-charges folios.read invoices.manage invoices.read logs.read maintenances.manage maintenances.read offer-index.read offers.read operations.change-room-state operations.trigger-night-audit payment-accounts.manage payment-accounts.read payments.manage payments.read prepayment-notices.read rateplans.read-corporate rateplans.read-negotiated rates.manage rates.read reports.read reservations.force-manage reservations.manage reservations.read routings.create routings.manage routings.read servicegroups.create servicegroups.manage servicegroups.read setup.manage setup.readFinally, click on 'Create'. You can create a new Calry Link and test the OAuth app flow now!
If you have any questions or need help, don't hesitate to reach out at mail@calry.app.